Prepare the Materials:
Basin
Close/Open/Socket Wrenches 08, 12
Philips (+) Screw Driver.
Flat Screw Driver
Long Nose Pliers
Sandpaper #1500 for Spark Plug
Bristle Brush
Rags
Put your bike on Center Stand, remove all the fairings in the carb portion.
Remove the Airbox screws on both sides using the Philips Screw Driver.
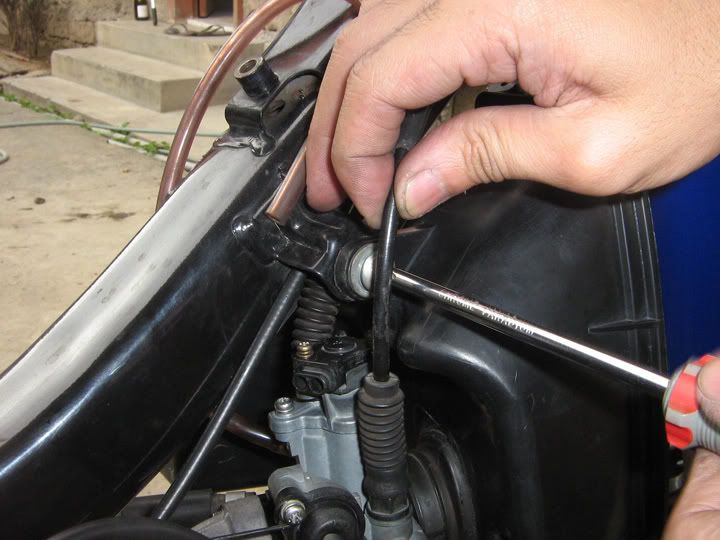
Unscrew the Airbox Clamp using the Philips Screw Driver from the rubber collar attached to the carburetor Air Intake mouth.
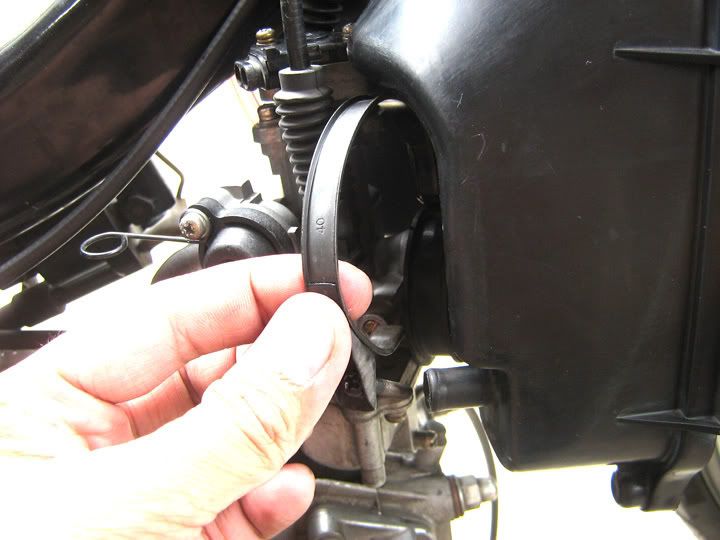
After pulling away all the hoses attached to the Airbox, pull the Airbox away from the carb.
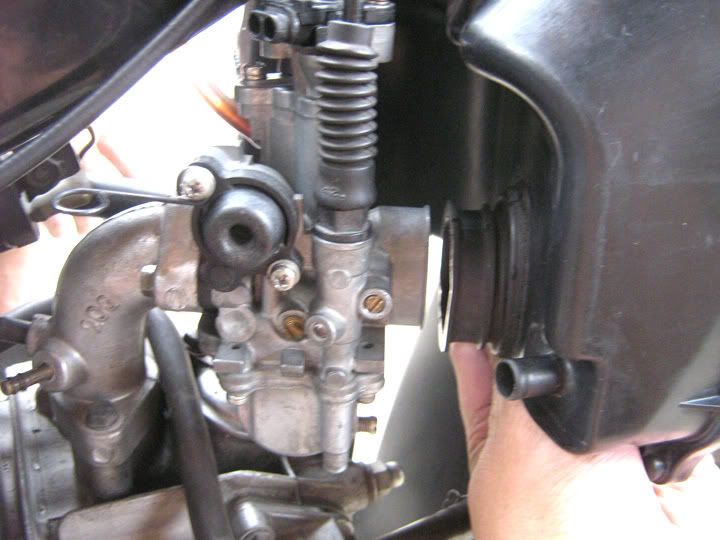
Remove the pink hose attached to the carb Air Inlet using your hands.
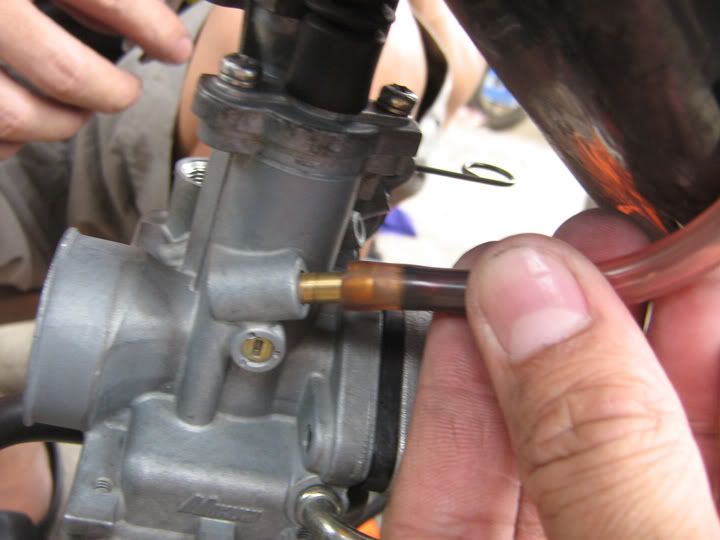
Using the long-nose pliers, pinch the hose clamp then pull the Fuel Supply Hose away from the carburetor gas inlet pipe.
Prepare the basin to catch the gasoline that will get drained from the hose. Use that gas to rinse the parts from dirt.
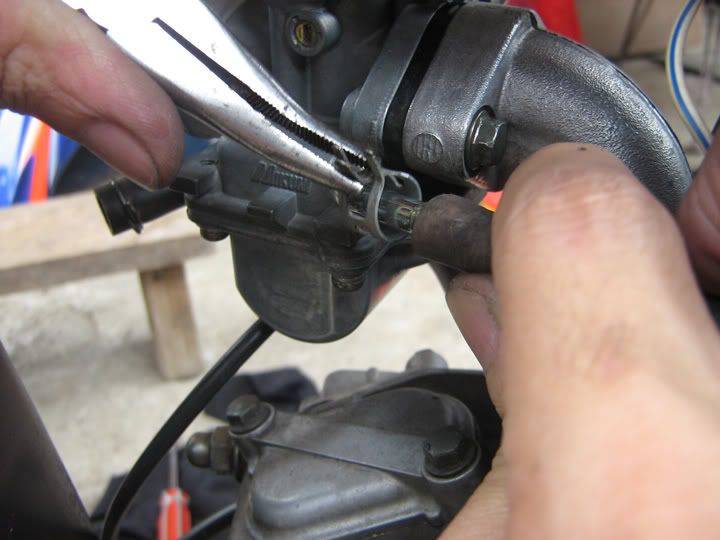
(to be continued...)PHILIPPINE SUZUKÍ RIDERS CLUB (PSRC-LG)
Exe-Board '11, Chap Pres '05-'10 LG05001, MCP100590, RFAC Volunteer, Shogun Pro '04, Raider '06-
March 18th, 2008 #2
Re: DIY: How to Clean Your Carburetor –by Harryblurred
(continuation, Part 2 DIY Caburetor…)
Using a 12mm open wrench, twist the Choke cap to loosen it, then unscrew using your hands.
Careful not to damage the thread, its only made of hard plastic.
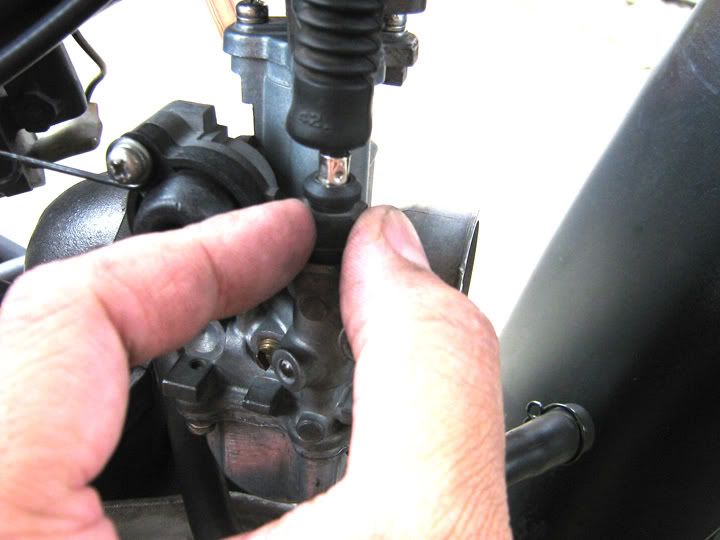
Pull the Choke end upwards.
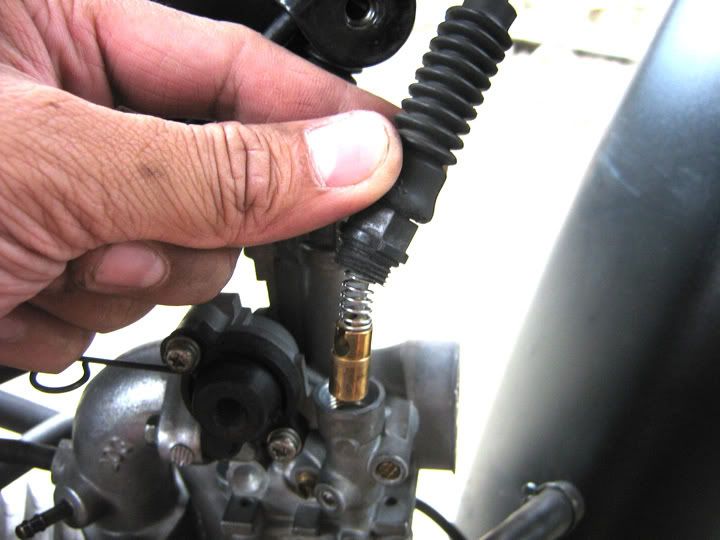
Using an 8mm open wrench, loosen the Intake Manifold screws that hold the carburetor in place.
Careful not to damage the screw head, the material is soft metal.
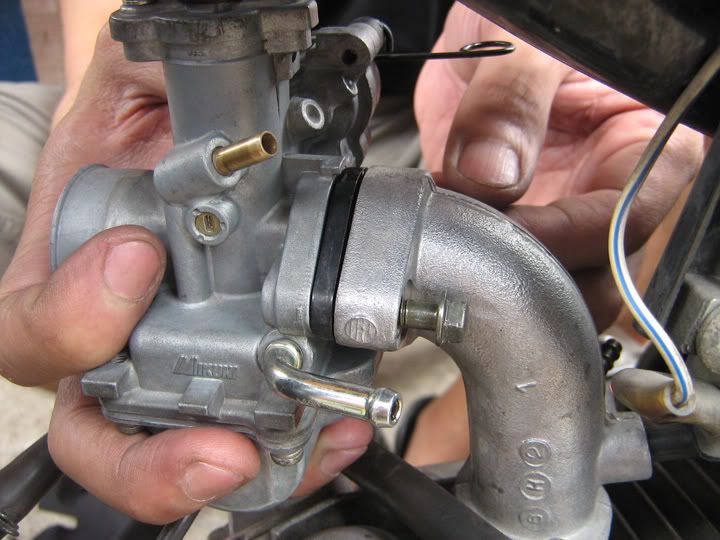
Remove the carb and set aside the Mica Heat Insulator and the 2 carb 8mm screws.
Clean it from sediments. Set it aside.
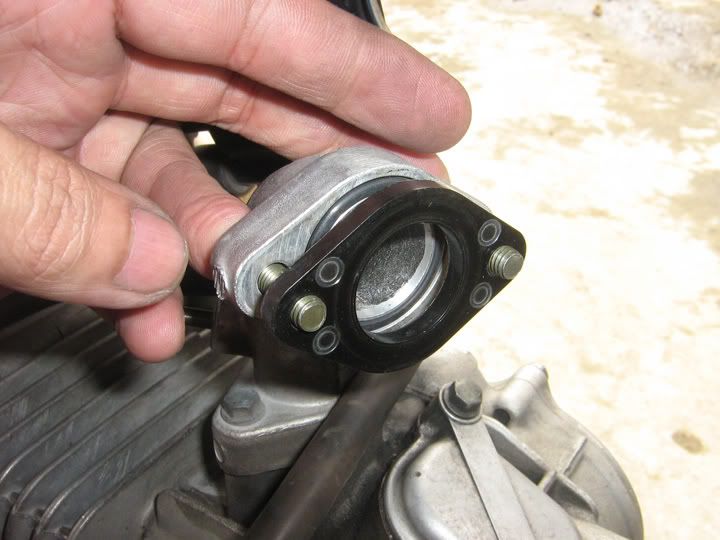
(to be continued...)PHILIPPINE SUZUKÍ RIDERS CLUB (PSRC-LG)
Exe-Board '11, Chap Pres '05-'10 LG05001, MCP100590, RFAC Volunteer, Shogun Pro '04, Raider '06 -
March 18th, 2008 #3
Re: DIY: How to Clean Your Carburetor –by Harryblurred
(continuation, Part 3 DIY Caburetor…)
Unscrew the Carb lid using the Philips Screw Driver.
Make sure you have a firm grip on the lid because it will spring-up when loosened.
Careful in handling the Throttle Spring with the needle at its end.
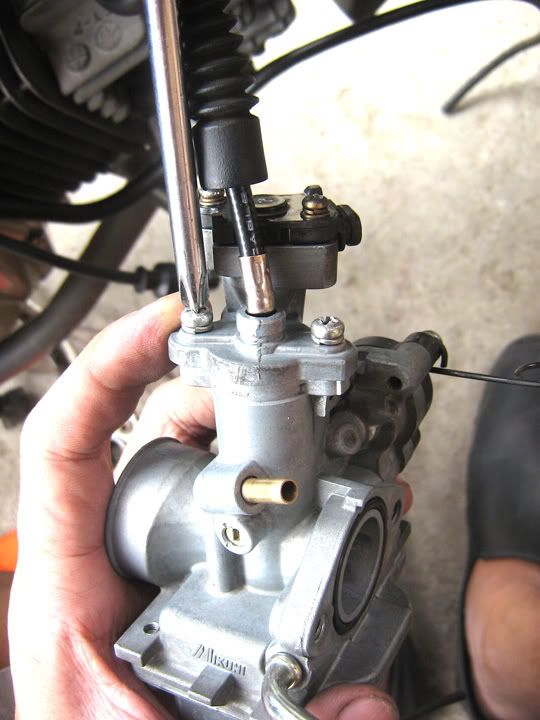
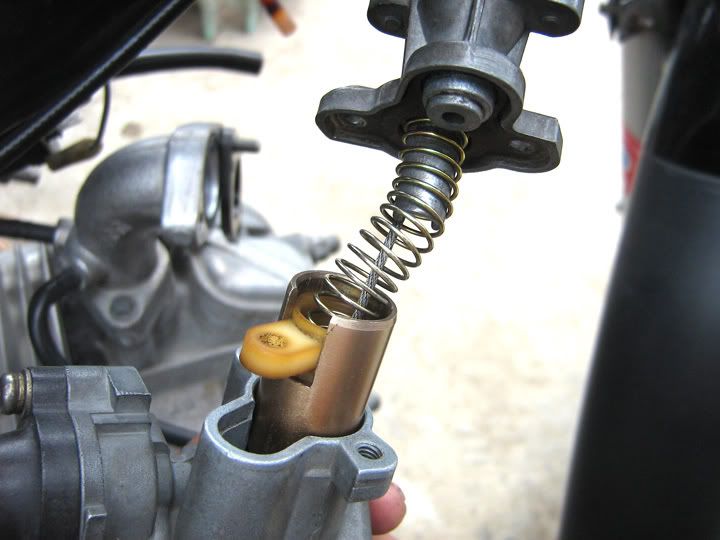
TIP: Remove the Fuel Cut-off spring shaft (not shown).
It is the shaft with a spring coil, inserted on the Needle Housing cap hole (white)
Its job is already irrelevant and condemnable.
Also to free up the Needle from any unwanted friction.
To have a quick response on the squeeze of the throttle.
Squeeze the throttle (not shown).
When the Needle housing has retracted together with the Spring, hold the whole assembly using your left hand..
Then return the throttle to zero to expose the cable end as shown.
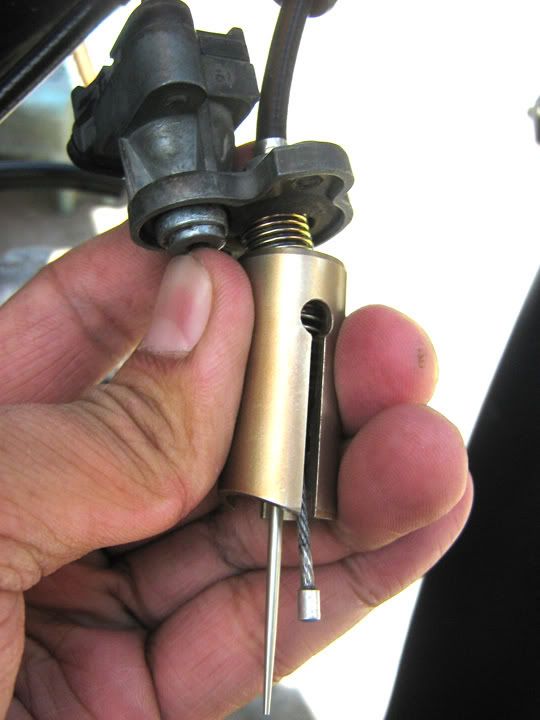
Lift the cable and insert the ball end through the whole on the Needle Housing as shown.
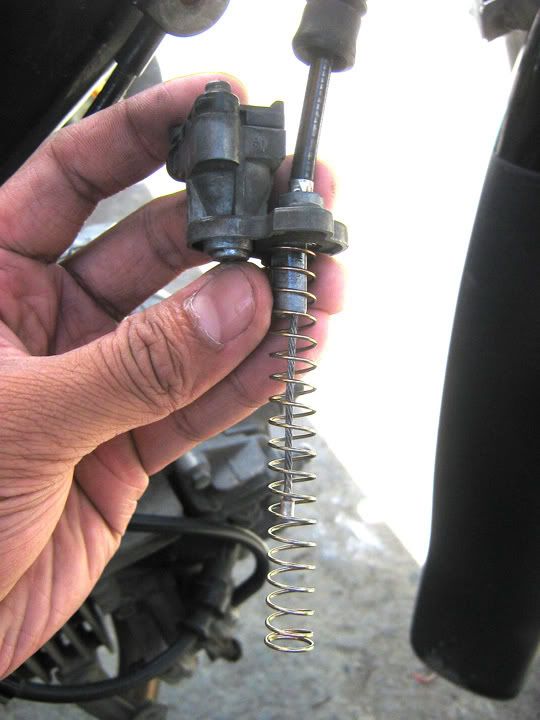
Then slowly pull-away the housing, remember the spring will leap away, hold onto it firmly.
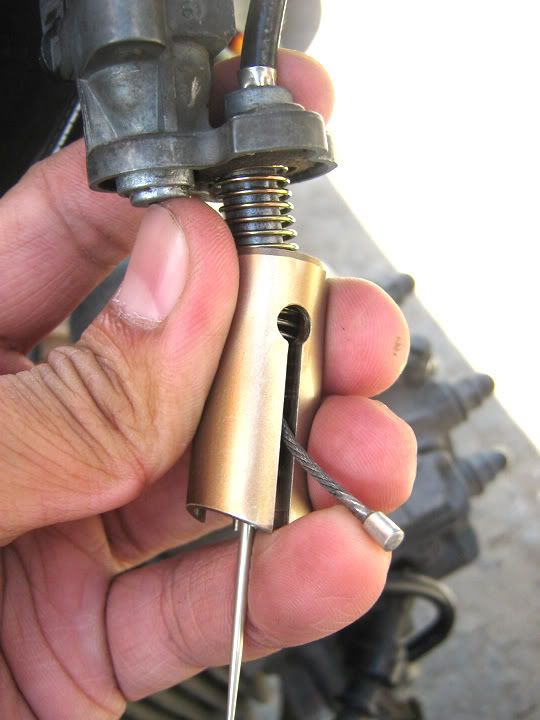
Set aside the Needle Housing, clean it using the gasoline that we drained earlier from the gas hose.
Then remove the throttle spring the Carb lid.
(to be continued...)PHILIPPINE SUZUKÍ RIDERS CLUB (PSRC-LG)
Exe-Board '11, Chap Pres '05-'10 LG05001, MCP100590, RFAC Volunteer, Shogun Pro '04, Raider '06 -
March 18th, 2008 #4
Re: DIY: How to Clean Your Carburetor –by Harryblurred
(continuation, Part 4 DIY Caburetor…)
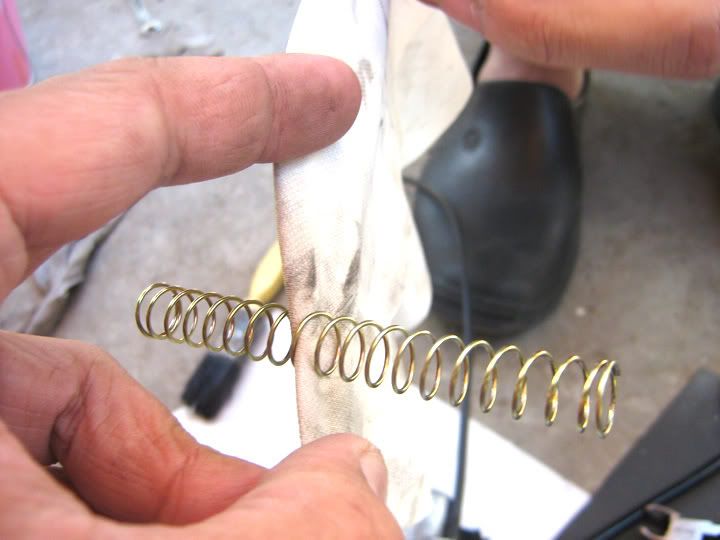
Clean the Throttle Spring using a rag dipped in gasoline.
Dismantle the Needle housing by placing your thumb exactly ontop of the housing..
Then pressing the needle 90o on a hard surface carefully, popping the cap from the lock position.
Pulling the (1) Needle Housing Cap, upwards. Clean thoroughly from gas sediments.
(2) Needle Spring, (3) Needle Assembly, (4) Needle Housing, arranged accordingly.
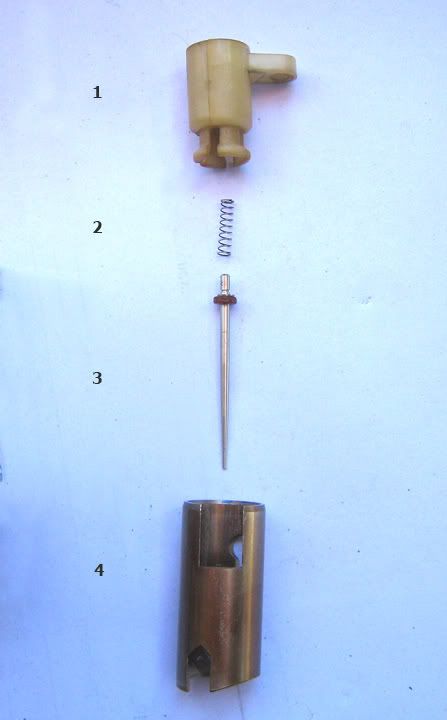
The exploded version of the Needle Assembly.
Labelled accordingly for your convenience:
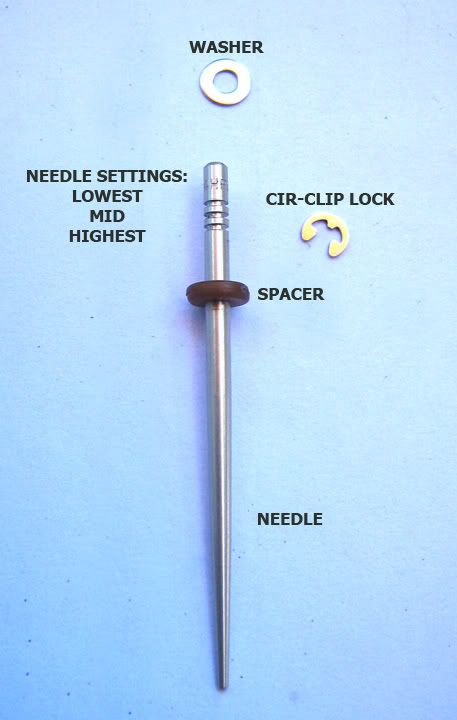
TIP: The Circlip is placed in the Mid Setting slot for stock mode.
Spacer underneath, then the washer ontop of the circlip.
After thoroughly cleaning the Needle parts, hold the housing and the needle assembly as shown.
Then place the spring on the washer on the end of the needle,
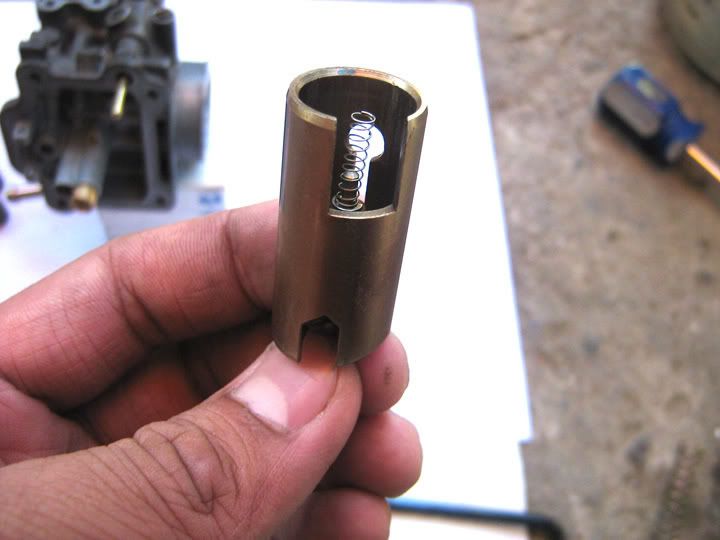
Then place the Needle Housing Cap, aiming the spring at the center.
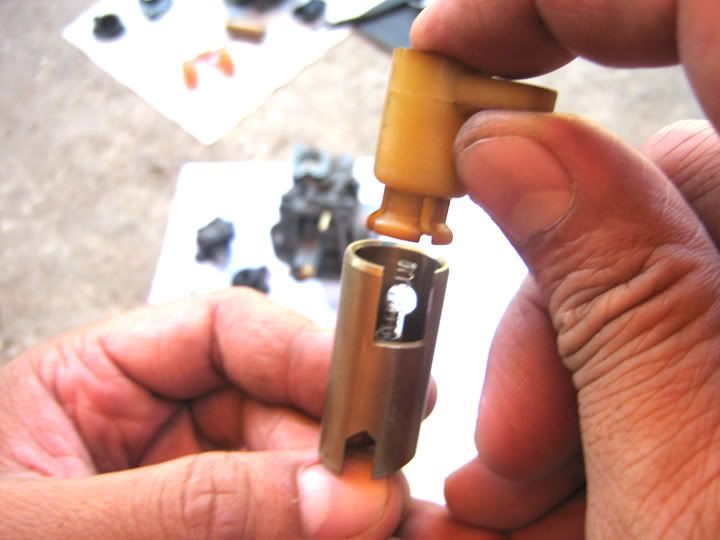
(to be continued...)PHILIPPINE SUZUKÍ RIDERS CLUB (PSRC-LG)
Exe-Board '11, Chap Pres '05-'10 LG05001, MCP100590, RFAC Volunteer, Shogun Pro '04, Raider '06 -
March 18th, 2008 #5
Re: DIY: How to Clean Your Carburetor –by Harryblurred
(continuation, Part 5 DIY Caburetor…)
Slide it in until it pops.
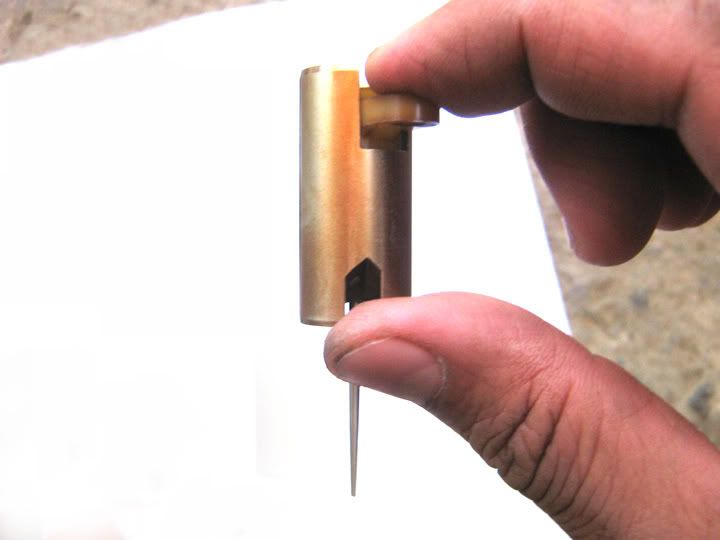
Remove the 4 Reservoir Screws at the bottom using the Philips Screw Driver.
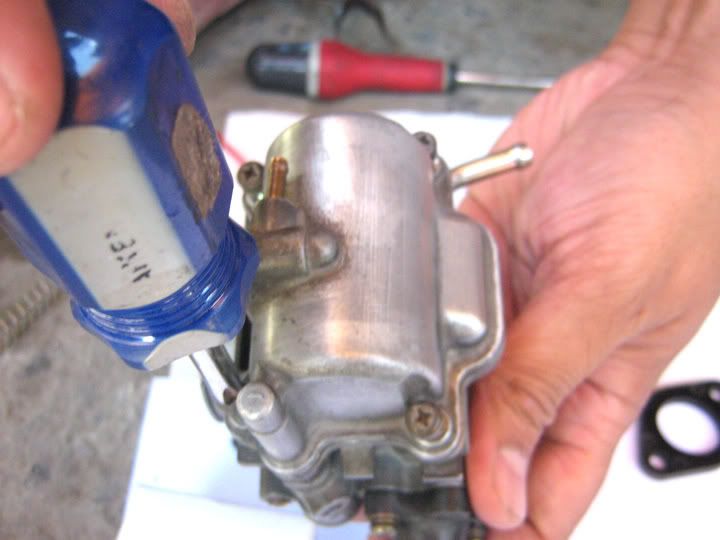
You will expose the Floater upon lifting the Reservoir cap.
Clean the Reservoir Cap from the film of sediments.
Careful not to damage the rubber seal.
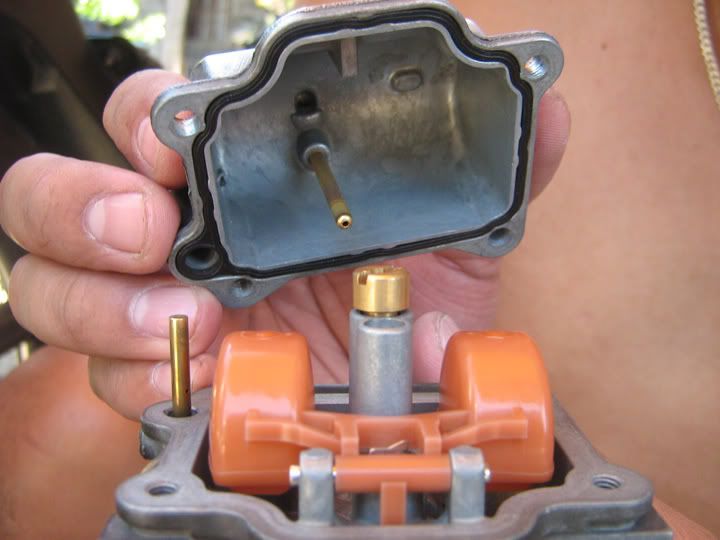
Hold the Floater firmly. Remove the Floater Axle.
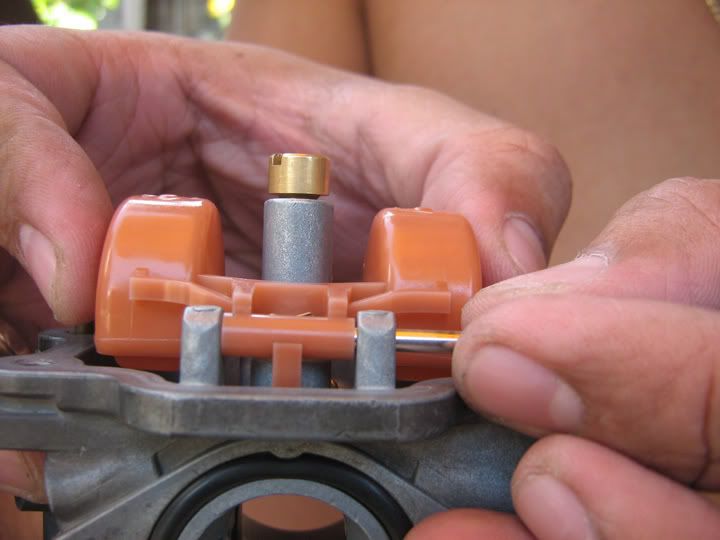
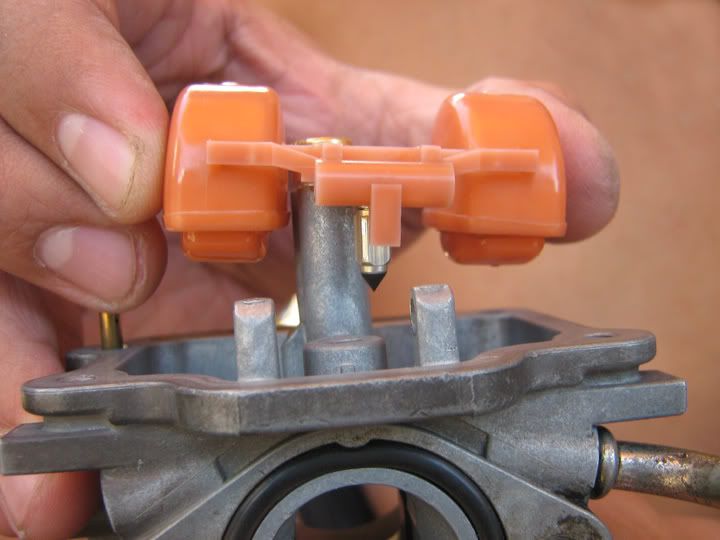
Carefully pull up the whole Floater Assembly, revealing the Pendulum.
Careful not to drop the Pendulum.
(to be continued...)PHILIPPINE SUZUKÍ RIDERS CLUB (PSRC-LG)
Exe-Board '11, Chap Pres '05-'10 LG05001, MCP100590, RFAC Volunteer, Shogun Pro '04, Raider '06 -
March 18th, 2008 #6
Re: DIY: How to Clean Your Carburetor –by Harryblurred
(continuation, Part 6 DIY Caburetor…)
The exploded version of the Floater Assembly.
Labelled accordingly for your convenience:
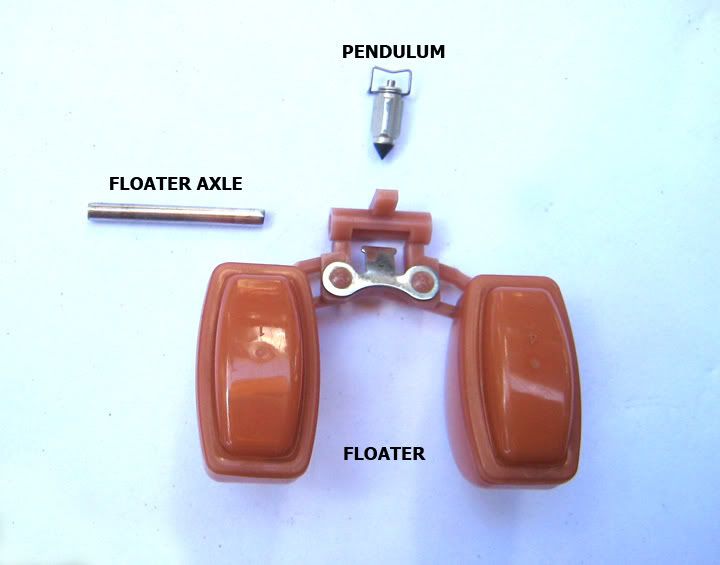
Clean the parts thoroughly using a clean rag damped with gasoline.
Remove the two Jettings using a Flat Screw Driver.
Carefully unscrew, the Jettings have a soft material.

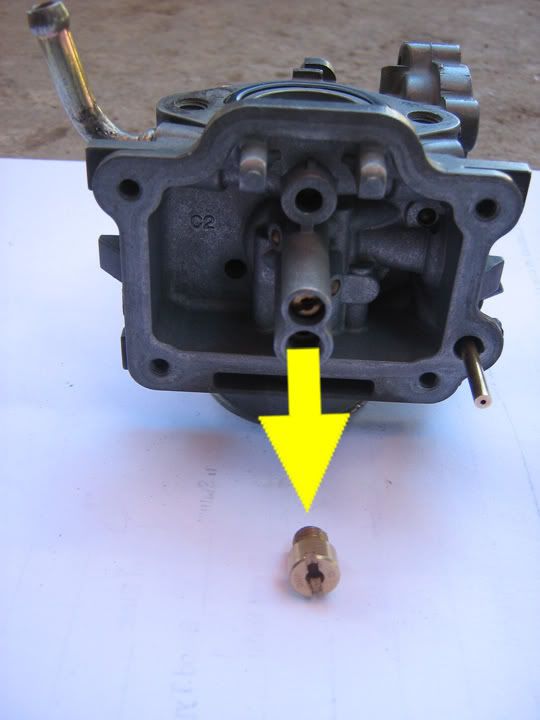
Peek in its hole against the light to see if there are any debris blocked in the holes.
Blow hard to remove the blockage.
Set aside after thoroughly cleaning.
Unscrew the 2 screws that hold the Diaphragm Cap.
Hold the cap firmly, so as not to spring out the coil.
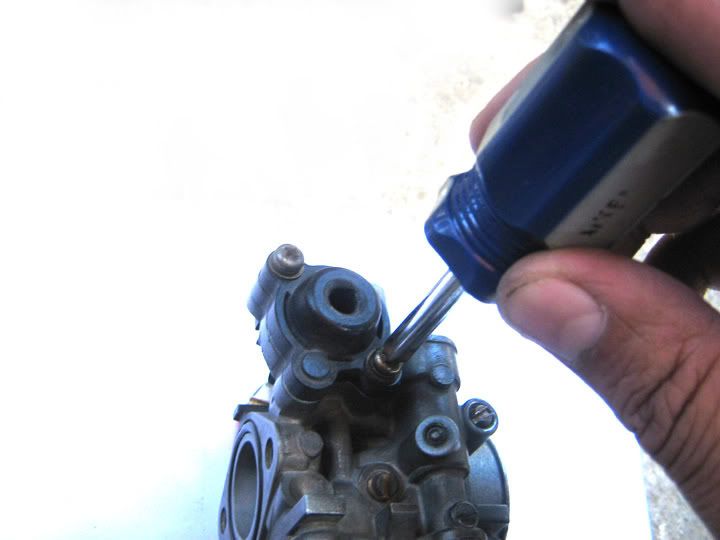
Slowly lift the lid to reveal the Spring Coil & The Primary Diaphragm.
Dip it in gasoline & Clean it with a rag.
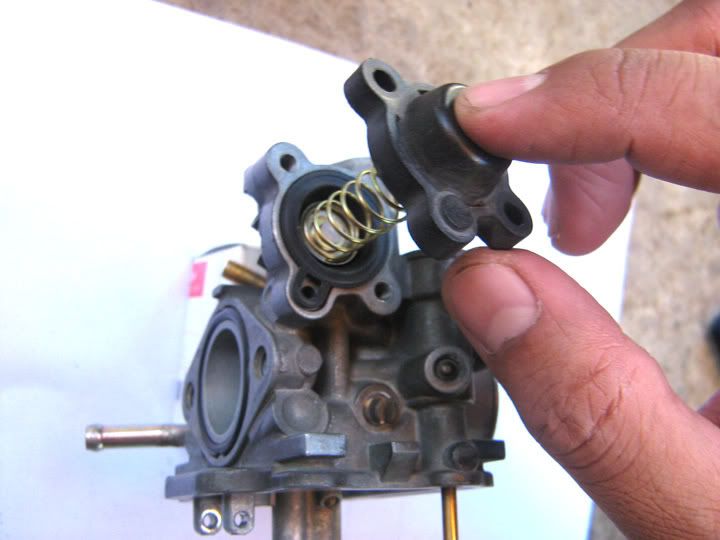
(to be continued...)PHILIPPINE SUZUKÍ RIDERS CLUB (PSRC-LG)
Exe-Board '11, Chap Pres '05-'10 LG05001, MCP100590, RFAC Volunteer, Shogun Pro '04, Raider '06 -
March 18th, 2008 #7
Re: DIY: How to Clean Your Carburetor –by Harryblurred
(continuation, Part 7 DIY Caburetor…)
Wipe off sediments on the Diaphragm.
Clean the ball bearing by blowing air on it.
Set aside after cleaning thoroughly.
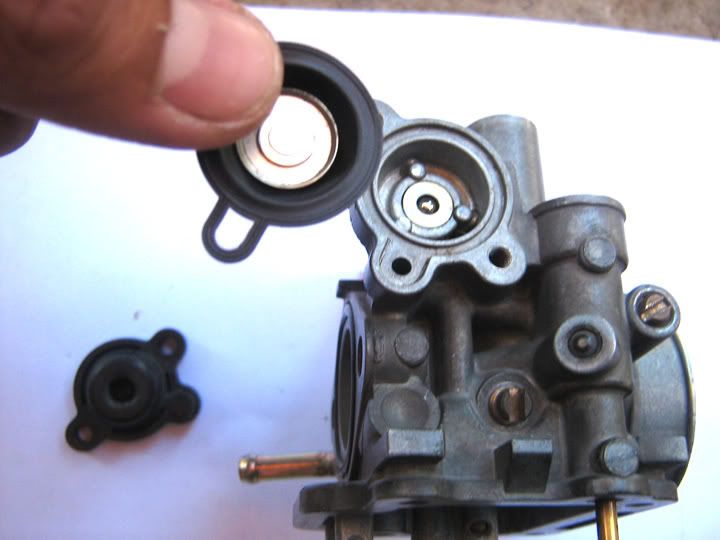
Remove the A/F Mixture Knobs (A&B) using a Flat Screw Driver.

Fuel Knob has a rounded end, it has a longer spring coil compared to the Air Knob.
Inside the slot it an o-ring & a washer. No need to remove.
Clean it from sediments. Set it aside.
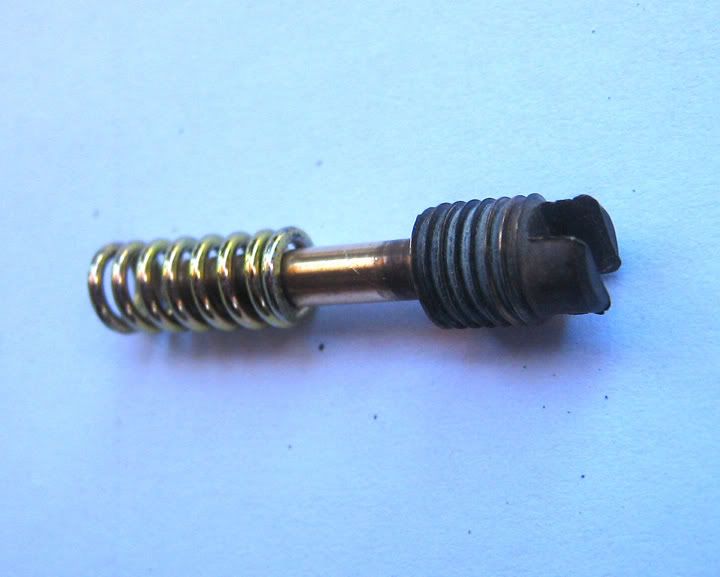
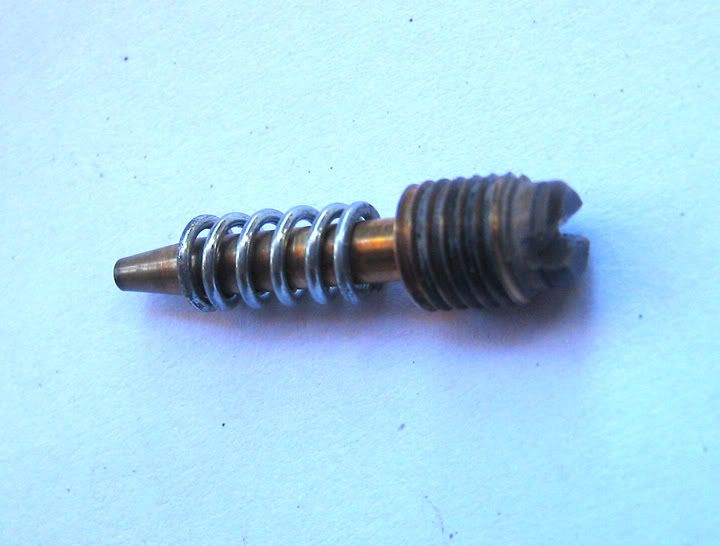
Air Knob has a pointed end, it has a shorter spring coil compared to the Fuel Knob.
Inside the slot it an o-ring & a washer. No need to remove.
Clean it from sediments. Set it aside.
Feast your eyes.
The naked Mikuni Carburetor, up close & Personal.
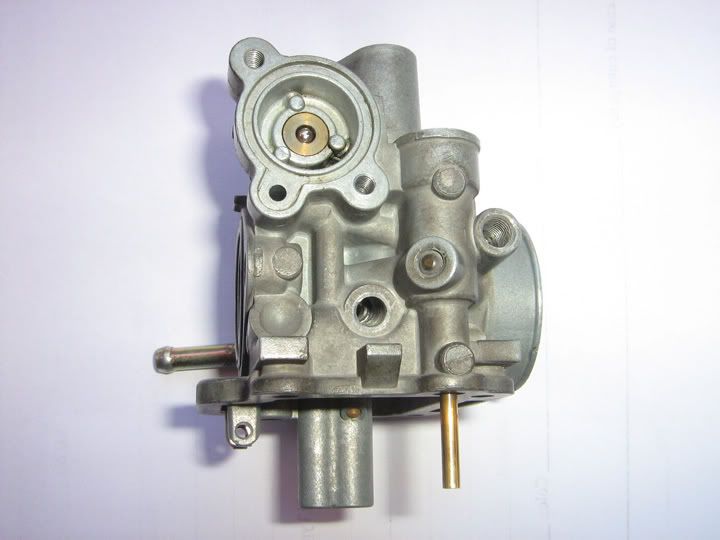
A/F Mixture Side (Diaphragm, A/F Mixture Knobs)
(to be continued...)PHILIPPINE SUZUKÍ RIDERS CLUB (PSRC-LG)
Exe-Board '11, Chap Pres '05-'10 LG05001, MCP100590, RFAC Volunteer, Shogun Pro '04, Raider '06 -
March 18th, 2008 #8
Re: DIY: How to Clean Your Carburetor –by Harryblurred
(continuation, Part 8 DIY Caburetor…)
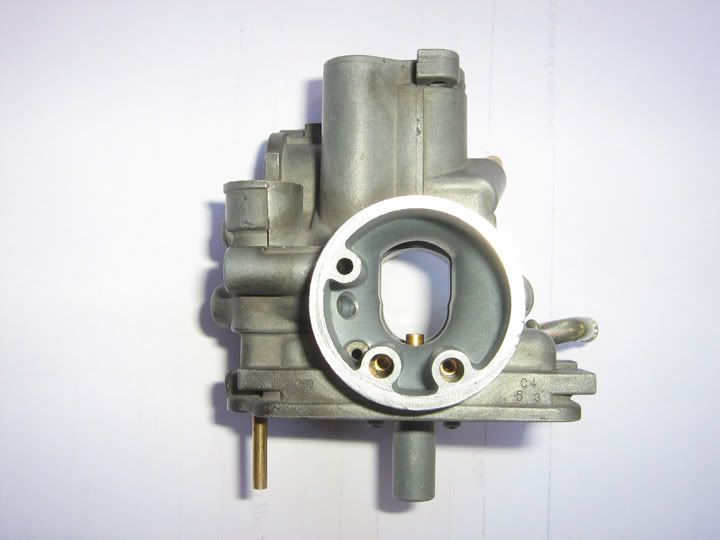
Air Box Side (Air Intake from Airbox, Jettings inlet, two at the bottom)
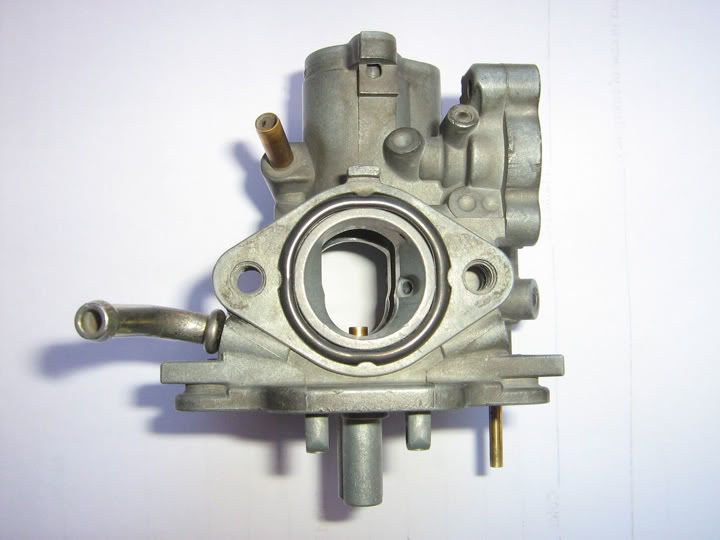
Intake Manifold Side (O-ring)
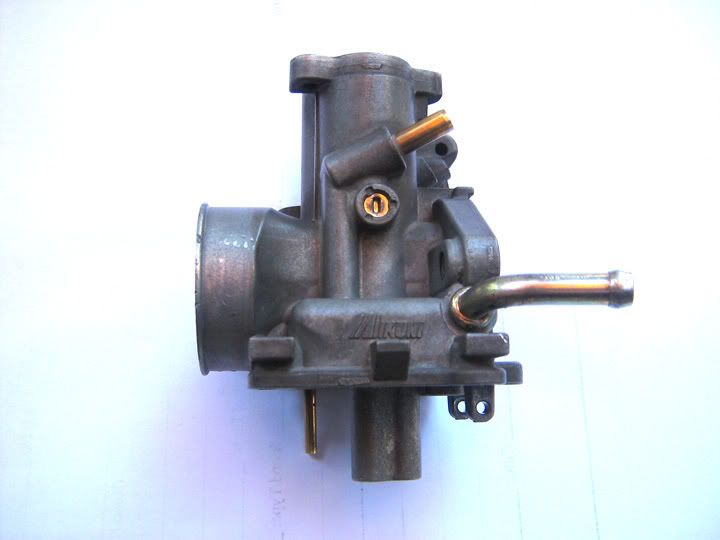
Fuel Supply Side (Gas Inlet Pipe)
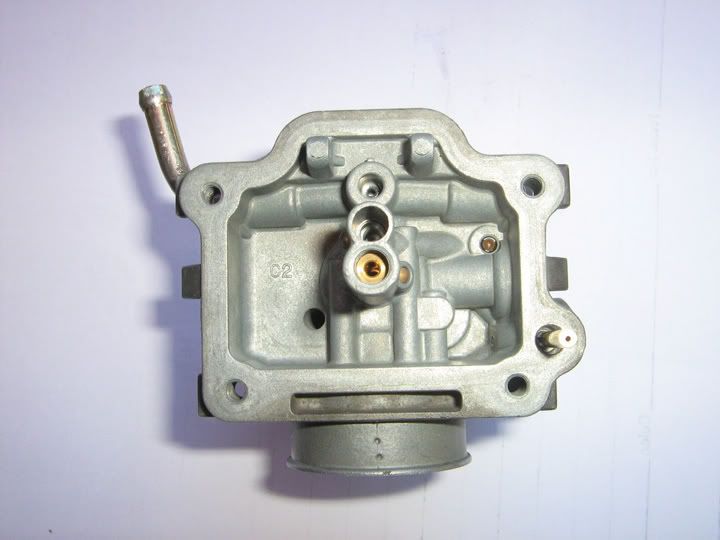
Bottom, Reservoir (Top hole: Pendulum slot, Jettings 1-Mid, Jettings 2-Bottom)
Top View
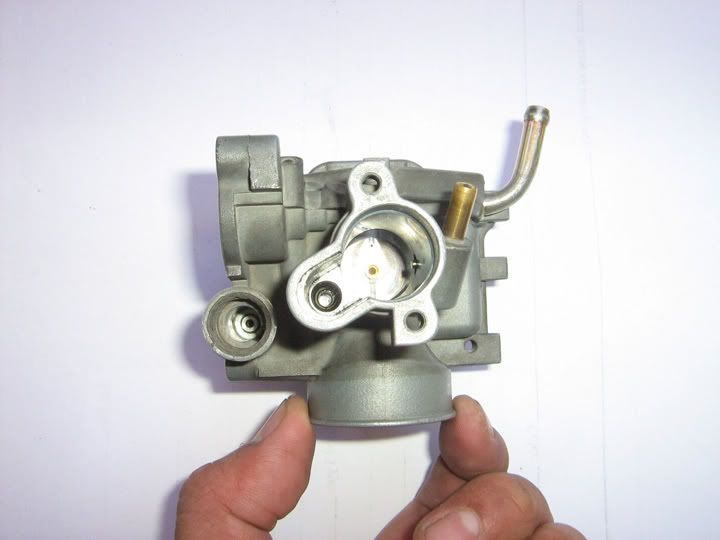
(Hole near my thumb: Choke; beside it is for the Fuel Cut-off coiled shaft & Needle Housing)
TIP: You can clean the Carburetor body from the oil & dirt by using Michael V’s dishwashing liquid.
With a bristle brush, lather & brush off the unwanted stains then blow dry.
(to be continued...)PHILIPPINE SUZUKÍ RIDERS CLUB (PSRC-LG)
Exe-Board '11, Chap Pres '05-'10 LG05001, MCP100590, RFAC Volunteer, Shogun Pro '04, Raider '06 -
March 18th, 2008 #9
Re: DIY: How to Clean Your Carburetor –by Harryblurred
(continuation, Part 9 DIY Caburetor…)
Return the parts accordingly so as not to forget anything:
A. Jettings 01: Tighten with a flat screw driver.
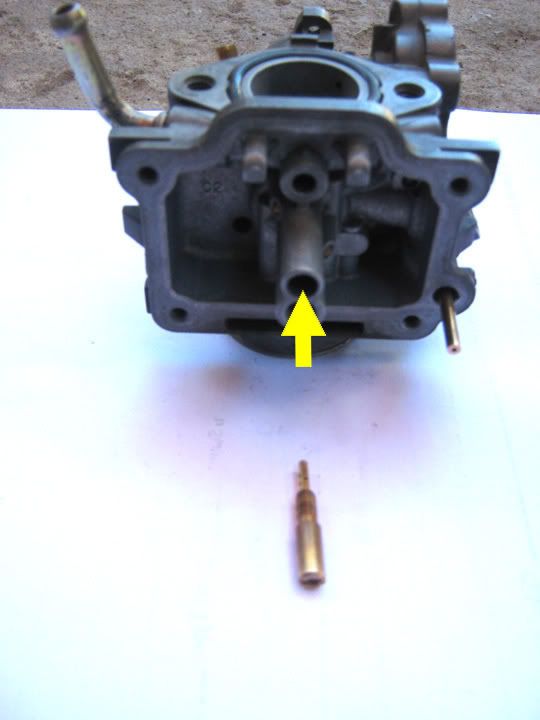
B. Jettings 02: Tighten with a flat screw driver.
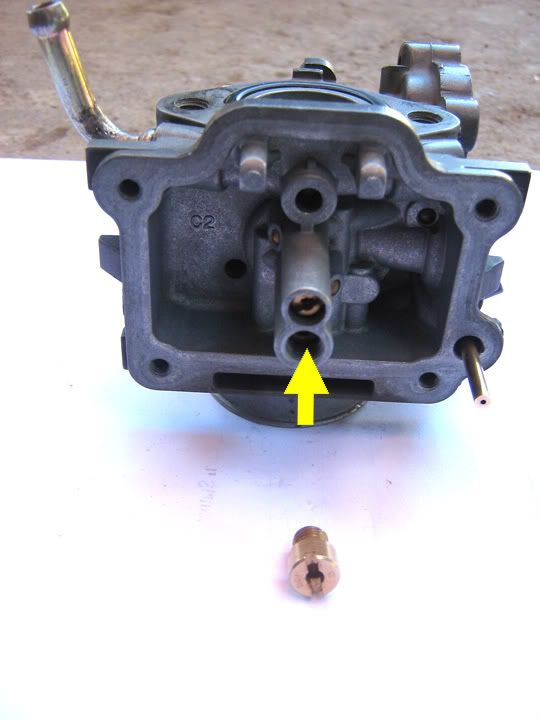
C. Reservoir Assembly: Pendulum, Floater

With bulgy side faced up. Put the Pendulum on the hook.
Insert the Pendulum in the slot.

Insert the Floater Axle.
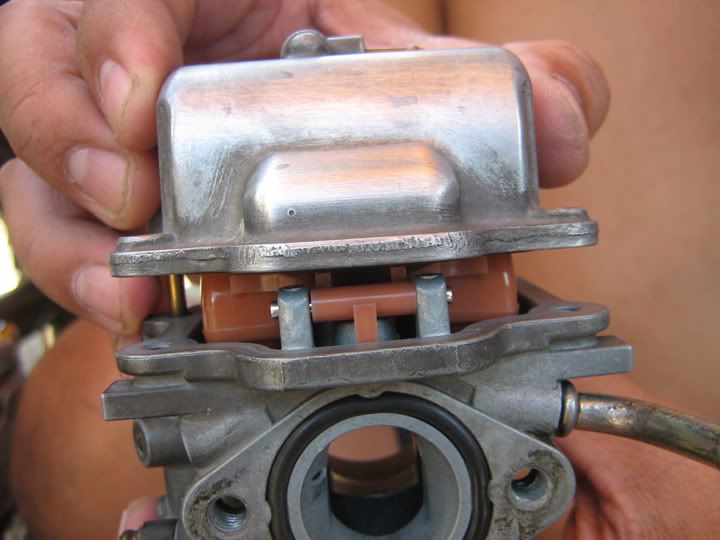
The Reservoir Cap.
(to be continued...)PHILIPPINE SUZUKÍ RIDERS CLUB (PSRC-LG)
Exe-Board '11, Chap Pres '05-'10 LG05001, MCP100590, RFAC Volunteer, Shogun Pro '04, Raider '06 -
March 18th, 2008 #10
Re: DIY: How to Clean Your Carburetor –by Harryblurred
(continuation, Part 10 DIY Caburetor…)
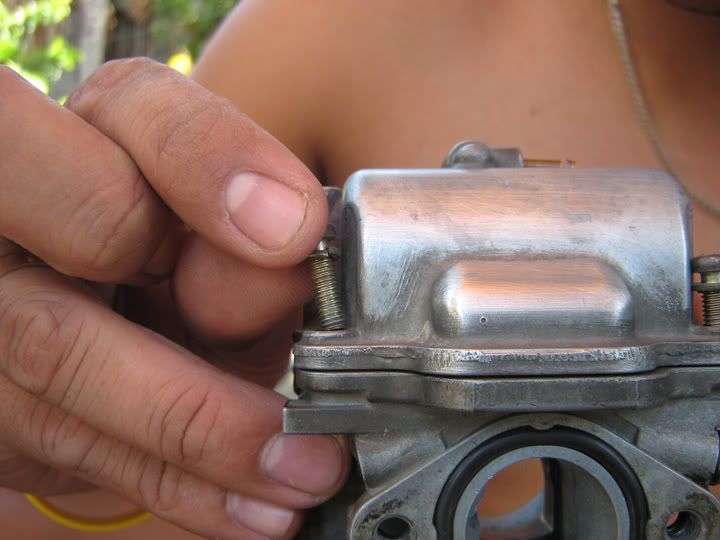
Reservoir Screws.

Tighten the screws alternately opposite each other.
D. Diaphragm

Place the Diaphragm exactly on the slot.

Place the coil, then hold it by the cap. Press.

Screw tight.
(to be continued...)PHILIPPINE SUZUKÍ RIDERS CLUB (PSRC-LG)
Exe-Board '11, Chap Pres '05-'10 LG05001, MCP100590, RFAC Volunteer, Shogun Pro '04, Raider '06 -
March 18th, 2008 #11
Re: DIY: How to Clean Your Carburetor –by Harryblurred
(continuation, Part 11 DIY Caburetor…)
E. A/F Mixture Knobs
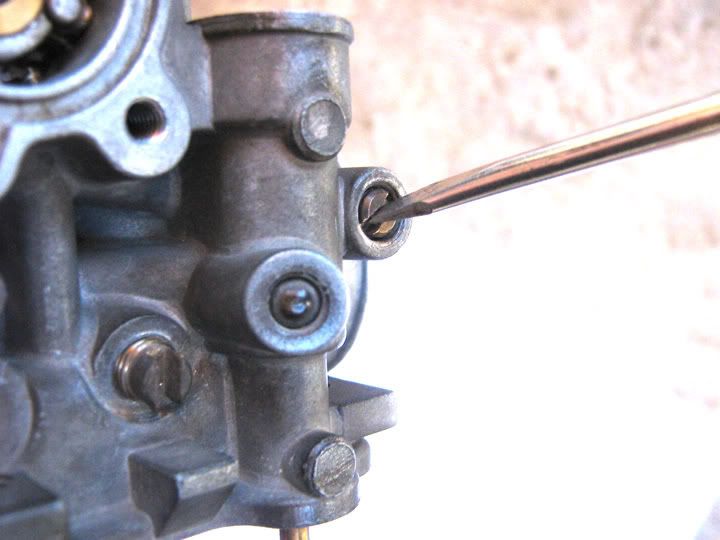
Fuel Knob, rounded end, on the Lower Left & Air Knob, pointed end, on the Upper Right.
The knob assembly: O-ring, Washer, Spring, Knob.
Tighten the Air Knob til it sets to zero setting.
TIP: On the last seen position, it will be your marker as ‘Zero’.
For a stock mode setting:
Rotate counter-clockwise twice, meaning you should have a 720° rotation from the zero mark..
F. Throttle Assembly

Insert the Throttle Cable in the Carb lid hole.
Insert the coil.
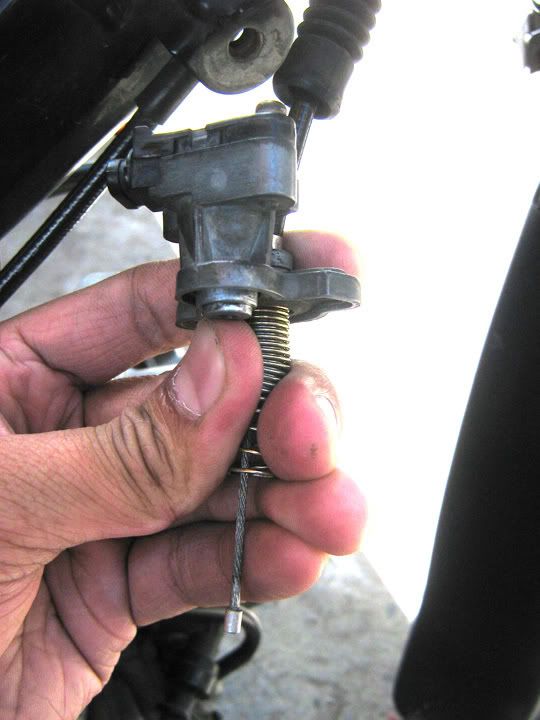
Retract the coil, and hold it firmly.

Place the Ball End of the cable through the Needle Housign Hole.

Align the cable straight.
(to be continued...)PHILIPPINE SUZUKÍ RIDERS CLUB (PSRC-LG)
Exe-Board '11, Chap Pres '05-'10 LG05001, MCP100590, RFAC Volunteer, Shogun Pro '04, Raider '06 -
March 18th, 2008 #12
Re: DIY: How to Clean Your Carburetor –by Harryblurred
(continuation, Part 12 DIY Caburetor…)
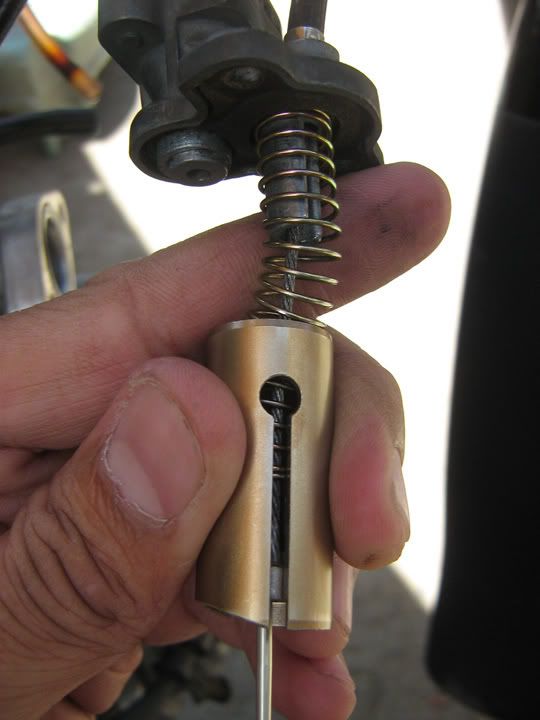
Squeeze the Throttle to pull back the cable.
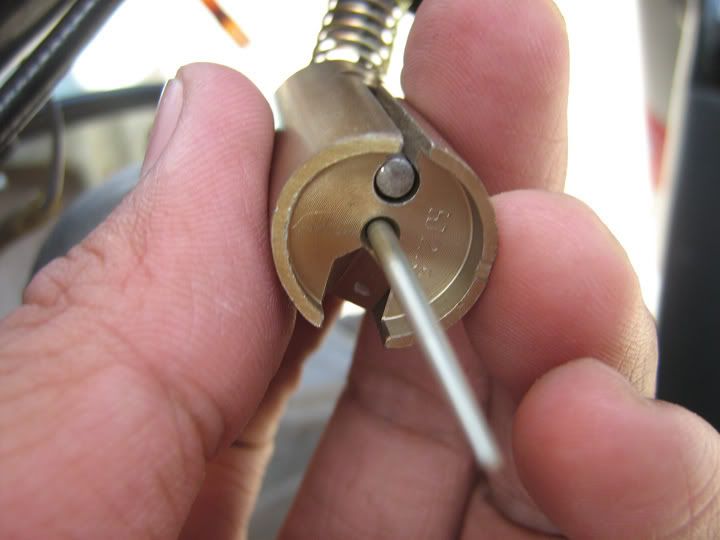
Double check if the Ball End fits snugly on the Ball End Slot.

Insert the Needle Housing.

Screw the Carb Lid.
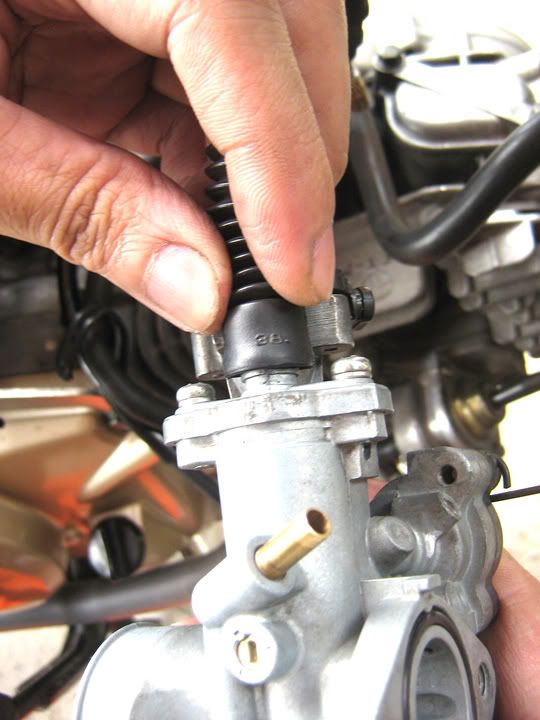
Return the Rubber collar for water protection.
(to be continued...)PHILIPPINE SUZUKÍ RIDERS CLUB (PSRC-LG)
Exe-Board '11, Chap Pres '05-'10 LG05001, MCP100590, RFAC Volunteer, Shogun Pro '04, Raider '06 -
March 18th, 2008 #13
Re: DIY: How to Clean Your Carburetor –by Harryblurred
(continuation, Part 13 DIY Caburetor…)
G. Choke

Wipe the Choke end and insert it into the Choke slot.

Tighten by the use of hand, then end it a bit tight with a 12mm.
Place the Rubber collar also to weather proof the choke inlet.
H. Intake Manifold

Place the Mika Heat Insulator in between the Intake Manifold & the Carburetor.

Then screw in the two 8mm Bolts.
I. Fuel Supply / Air Inlet Hose

The Pink Hose.
(to be continued...)PHILIPPINE SUZUKÍ RIDERS CLUB (PSRC-LG)
Exe-Board '11, Chap Pres '05-'10 LG05001, MCP100590, RFAC Volunteer, Shogun Pro '04, Raider '06 -
March 18th, 2008 #14
Re: DIY: How to Clean Your Carburetor –by Harryblurred
(continuation, Part 14 DIY Caburetor…)

The Hose Clamp & The Fuel Supply Hose.
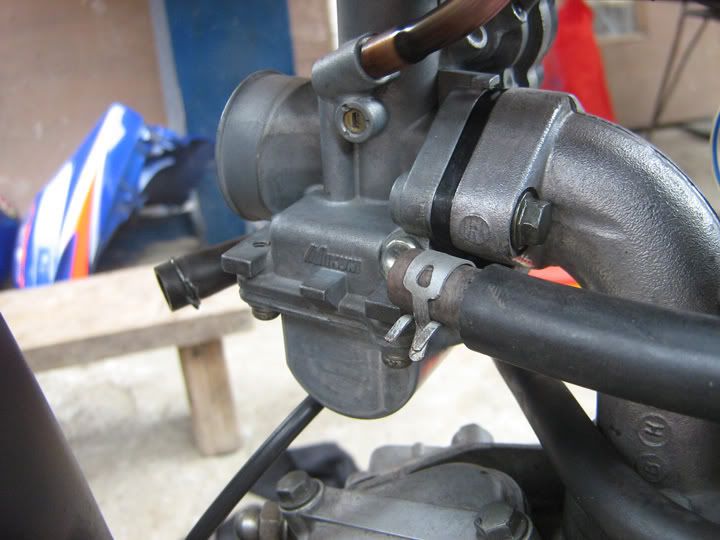
See how it fits snugly?
J. Airbox

Insert the Rubber Collar into the Air Intake mouth of the carb.
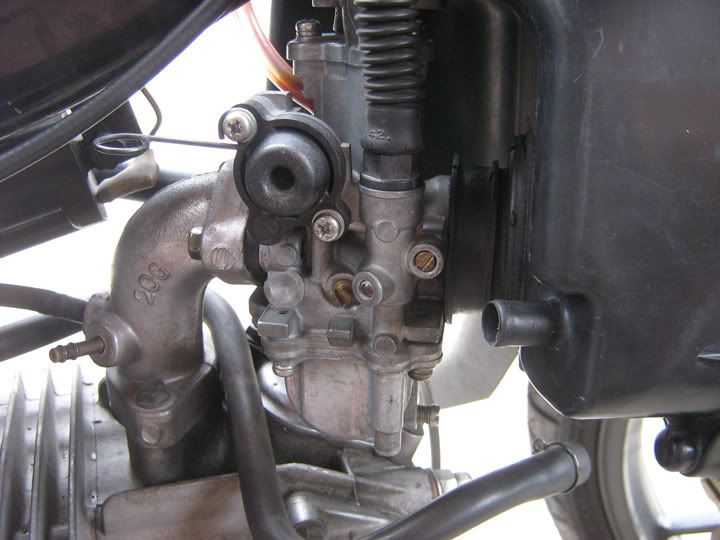
Observe how it fits exactly on the mouth.

Clamp.
(to be continued...)PHILIPPINE SUZUKÍ RIDERS CLUB (PSRC-LG)
Exe-Board '11, Chap Pres '05-'10 LG05001, MCP100590, RFAC Volunteer, Shogun Pro '04, Raider '06 -
March 18th, 2008 #15
Re: DIY: How to Clean Your Carburetor –by Harryblurred
(continuation, Part 15 DIY Caburetor…)
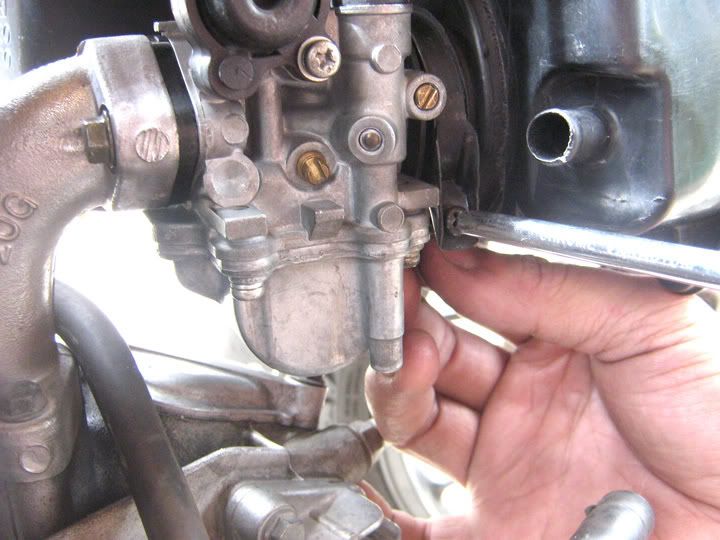
Screw it!
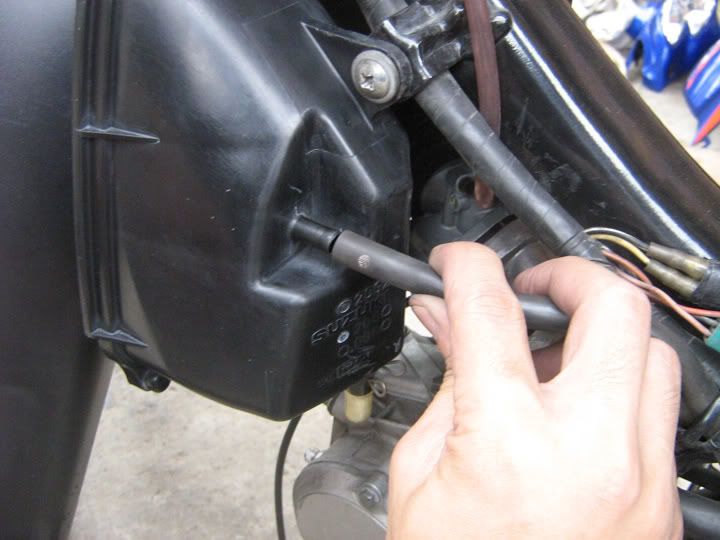
Insert the Leftside hose then do the Rightside (Secondary Diaphragm hose) too.

Screw it!
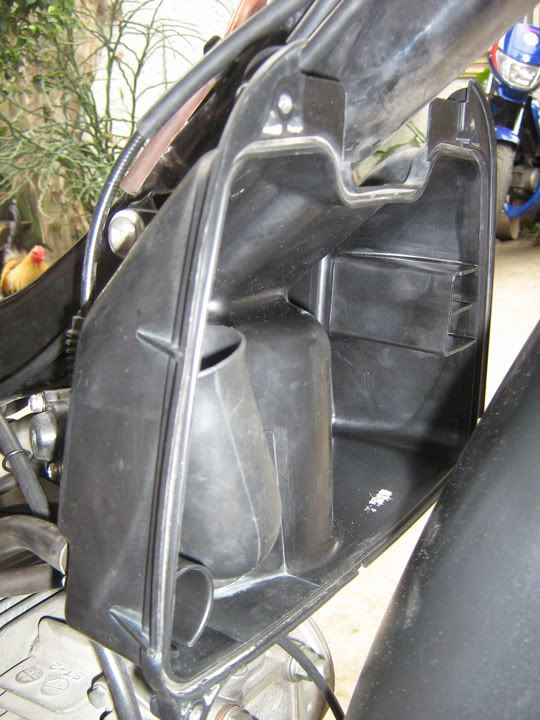
Air Box, rear portion.
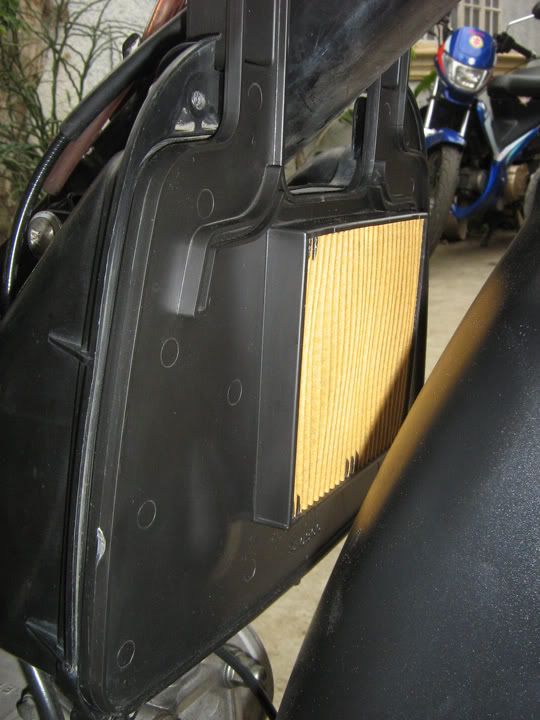
Air Filter. (Linis no?)
(to be continued...)PHILIPPINE SUZUKÍ RIDERS CLUB (PSRC-LG)
Exe-Board '11, Chap Pres '05-'10 LG05001, MCP100590, RFAC Volunteer, Shogun Pro '04, Raider '06 -
March 18th, 2008 #16
Re: DIY: How to Clean Your Carburetor –by Harryblurred
(continuation, Part 16 last part, DIY Caburetor…)

Airbox Cover.

Seal it with a kiss.
Start the engine.
Once the ignition is on & running, set your Idling to your desired setting by twisting counter-clockwise.
And smile.
Hope This Helps! Happy Cleaning!
Harryblurred. [/B]
(Thanks for Grayfox’ helping hand.)PHILIPPINE SUZUKÍ RIDERS CLUB (PSRC-LG)
Exe-Board '11, Chap Pres '05-'10 LG05001, MCP100590, RFAC Volunteer, Shogun Pro '04, Raider '06 -
Post Thanks / Like - 1 Thanks, 0 Likes, 0 Dislikes
 l.a_santiago thanked for this post
-
March 18th, 2008 #17
Re: DIY: How to Clean Your Carburetor –by Harryblurred
Grabe matrabaho ito!!! Nice reference again... Keep it up Sir Harry.... Sticky na dapat ito!!!

-
March 18th, 2008 #18
Re: DIY: How to Clean Your Carburetor –by Harryblurred
Honga e... thanks!
Pero di bale, as long as marami nakikinabang..
Laking tipid din kung marunong ka maglinis ng sarili mong carb, db?
Sensya na ha kung marumi kuko ko, hehehe PHILIPPINE SUZUKÍ RIDERS CLUB (PSRC-LG)
Exe-Board '11, Chap Pres '05-'10 LG05001, MCP100590, RFAC Volunteer, Shogun Pro '04, Raider '06 -
March 18th, 2008 #19
Re: DIY: How to Clean Your Carburetor –by Harryblurred
thanks. meron ba how to change fork oil?

DELIVER US FROM "EVIL" -
March 18th, 2008 #20
Re: DIY: How to Clean Your Carburetor –by Harryblurred
PHILIPPINE SUZUKÍ RIDERS CLUB (PSRC-LG)
Exe-Board '11, Chap Pres '05-'10 LG05001, MCP100590, RFAC Volunteer, Shogun Pro '04, Raider '06 -
March 18th, 2008 #21
Re: DIY: How to Clean Your Carburetor –by Harryblurred
nice read bro. thanks for this...eto hinahanap ko, takot kasi ako magbaklas nang carb ko...
 Operation balik all-stock successful!
-
March 18th, 2008 #22
Re: DIY: How to Clean Your Carburetor –by Harryblurred
nicely done sir harry, dami matutulungan nito.... up for this thread!
MCPF Member 101927 -
March 18th, 2008 #23
Re: DIY: How to Clean Your Carburetor –by Harryblurred
MABUHAY KA SIR HARRY!!! sana dumami pa ng maraming-marami lahi mo... up up up...
JTMJ
Order of De Molay|Makati Moto Club 2003|GY6 Brotherhood|Team SparX|HELMET|ROME|MRO|Adventure Team Phils.|MRT 5|PEER 2|1,000 Miles Motorally|Safe Run 2012|FLAG -
March 18th, 2008 #24
Re: DIY: How to Clean Your Carburetor –by Harryblurred
Good job sir HARRY!
Thank you for sharing. -
March 19th, 2008 #25
Re: DIY: How to Clean Your Carburetor –by Harryblurred
Ganda nito, sana ma sticky for reference.

ERONG
making money online
Tuesday, December 2, 2014
Clean Your Carburetor
Subscribe to:
Comments (Atom)
 Reply With Quote

 Digg
Digg
 del.icio.us
 StumbleUpon
 Google